Monday, August 31, 2015

Paper Sweeties Inspiration #35 Challenge ~ Sweet Apple Teacher Gifts!! =)

Pin It


Hello!!
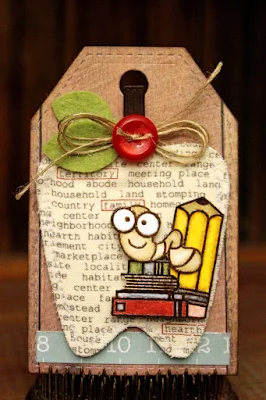
It's time for a NEW Paper Sweeties Inspiration #35 Challenge!! I thought it would be FUN to create some Sweet Apple Blossoms Teacher Gifts!! =) I decide to use the Pretty Posies Sweet Cuts to create some Felt Apple Blossom Flowers onto a Tag and then I tied some Pencils on the Side!! I think this would be FUN for just a Sweet Birthday Present or even just a Thinking of You Gift!! I Stamped and Embossed the Sentiment with some Creative Masking and I LOVE the way the Double Toned Sentiment looks!! A Few Vintage Buttons and some of the Gold Paper Sweeties Flower Sequins and my Tag was done!!
I hope you'll stop by the rest of the AMAZING Paper Sweeties Design Team Blogs to see what they have created!!
Debbie Marcinkiewicz – Paper Sweeties
THANKS SO MUCH for stopping by and I hope you have a Fabulous Week!!
COUNTRY HUGS-N-KISSES
LARISSA  =)

Sunday, August 30, 2015

Kitty Cat Face Pumpkin Felt Candle Wrap w/ Poppystamps!! =)

Pin It
Challenge Badge copy
0815 copy
HELLO!!
I LOVE LOVE LOVE this Poppystamps Challenge #11 ~ The Heat is on!! With the Changes in the Weather and Fall coming I'm READY for all that comes with it!! I've been wanting to create some Felt Candle Wraps for awhile now!! I used the New Poppystamps Kitty Cat Face Die and I Die Cut it from SEVERAL Layers of Felt and wanted to create a Pumpkin that was Carved with the Kitty at Face and then Lite Up from the Inside creating a WARM Glow!! Hence the Challenge "The Heat Is On"!!  =) I used the Memory Box Stitched Circle Dies and then a Poppystamps Leaf Die Cut from the Wreath Die!! I created a Resin Vintage Paper layer for the Translucent backing for my Kitty Cat Face and this is the COOLEST Paper EVER!! I Coated the Vintage Book Paper with Ice Resin and then let it set up!! It Hardens and becomes Translucent so you can see through it!! It can be used for SO MANY NEAT things too!! I added some Gold Metallic Stitching around the Circles using my Sewing Machine and added a Button and some Burlap Twine to finish it off!! SQUEAL!! I just LOVE LOVE LOVE the way it turned out!! My Candle is a LED Glitter Candle from Hobby Lobby!! They came in a Set of Three so I think I'm gonna have to create a couple more of these with different Carvings!!??  =)
I have SEVERAL others in the works using LOTS of different Dies and I CAN'T WAIT to share them and give them away as Gifts as I have LOTS of FALL Birthdays to Celebrate!! =)
I'm also linking up to the Simon Says Stamp Wednesday Challenge: Anything Goes!!
Simon Wednesday Challenge Blog
THANKS SO MUCH for stopping by and I hope you have a FABULOUS WEEK!!
COUNTRY HUGS-N-KISSES
LARISSA   =)

Paper Smooches SPARKS ~ Anything Goes Challenge!! =)

Pin It
(This s my Third Post for today!! For my Cupcake Inspirations Challenge Post and my PTI Challenge Post Please Scroll Down or just Follow the Links!! THANKS!!)


Hello!!
I'm here to share a Few Projects for the New Paper Smooches SPARKS Challenge!! This weeks theme is Anything Goes!! I'm sharing the LAST of my Teacher Inspired Projects and I just LOVE the way they all turned out!!

I've used the PS Smarty Pants and Spreading Sunshine Stamp Sets along with the Smarty Pants Icons and Easel Dies for my Card today!! I created this for Beckett's Math Teacher and it was a HUGE hit!! =) I used my Distress Markers to Water Color the Image and then I created a FUN 3-D Pencil kind of as a Podium of sorts!! I did some Creative Masking in order to Emboss on the word "Smile" in the Sentiment and I LOVE the way it looks!! I thought it would be FUN to add the Die Cut Thumb Tack to his Hand so I Embossed the End of the Tack too!! HEHEHEHEHE!! =) (So it's supposed to look like he needed to stand on top of the "Pencil Podium" in order to put the Thumb Tack into the "Quote" on the Easel!! FUN RIGHT!!??  =)
For the Clip Board on the Second Tag I just Cut Off the Legs on the Easel!! I LOVE that you can get MORE uses out of it this way!! =)
I used the   Stamp Set to create a FUN Rainbow of Colors that I Embossed using some Wendy Vechii Embossing Powders!! I then added the Easel that I added a Canvas Die Cut to for the Sentiment!! I Stamped and Embossed it too using some Creative Masking so I could just Emboss part of the Sentiment in a different Color!! I also added the Paintbrush that I Embossed the Top of the Brush on to look as though it had been used to add the Sentiment!! I just LOVE the way it turned out!! =)
  For the Notebook Pages I just Die Cut SEVERAL Printer Paper Die Cuts that I Stitched together!! I Glued the Front and Back Covers to the First and Last Pages of the Notebook Insides to create a Seamless Notebook!! I added some Burlap Twine and a Vintage Button and my Notebook Cover was done!!
I hope you'll stop by the rest of the AMAZING Paper Smooches Design Team Blogs to see what they have created this week!! =)
                                              Audrey
Larissa-you're here!!
Don't forget to stop by the Paper Smooches SPARKS Blog for more details!! This Challenge ends September 5th!!Hope you'll join in the fun!!?? I CAN'T WAIT to see what you create!!  =)
I'm also linking up to the Simon Says Stamp Wednesday Challenge: Anything Goes!!
Simon Wednesday Challenge Blog
THANKS SO MUCH for stopping by and I hope you have a FABULOUS WEEK!!
COUNTRY HUGS-N-KISSES
LARISSA   =)

Newton's Nook Designs for Cupcake Inspirations Challenge #325!! =)

Pin It
Newton's Nook Designs


Hello!!
I'm stopping in to share a Sweet Little Cupcake Holder and Topper that I made for the New Cupcake Inspirations Challenge #325!! Newton's Nook Designs is a Sponsor for this Challenge so you have a Chance to win a $20 store credit to their store at newtonsnookdesigns.com!! How AWESOME!! =) I've used the Newton's Nook Designs Love A La` Carte Stamp Set along with the Daisy Images from the Garden Whimsy Stamp Set!!   

Love a la Carte Stamp Set by Newton's Nook Designs  Garden Whimsy | 4x6 Photopolymer Stamp Set | Newton's Nook Designs
The Cupcake Holder was Die Cut using the Stitched Scalloped Lawn Fawn Die and I just LOVE the way those Stamped and Embossed Daisies dress it up!! A White Bow finished off the Design!!
THANKS SO MUCH for stopping by and I hope you'll join in on the FUN for a Chance to Win!!
Have a FABULOUS WEEK!!
COUNTRY HUGS-N-KISSES
LARISSA  =)

SAF 2015: Accessories Challenge ~ Felt Necklace/Earrings =)

Pin It

SAF-2015-logo
SAF 2015: Accessories Challenge

Hello!!
I'm stopping in to share the FUN Earrings and Necklace that I made for the SAF 2015: Accessories Challenge ~ Felt Necklaces with Erin Lincoln!! I KNEW I wanted to create a Play on a Dream Catcher Design!! Both the South Western Style and Tassels are HUGE in Fashion/Trends right now so I thought tis would be a FUN Idea to run with!! After I selected my Main Base Materials I decide on the Paper Trey Ink Sewing Staples: Floral Cluster Die Collection for the Felt Pieces of my Design!! I used some Antique Brass Wire for Stitching my Felt Flowers onto the Base of my Pieces and then I used various Beads and I REALLY LOVE the way they turned out!!
THANKS SO MUCH for stopping by and I hope you have a FABULOUS WEEKEND!!
COUNTRY HUGS-N-KISSES
LARISSA  =)

Saturday, August 29, 2015

Reverse Confetti #27 Challenge ~ Princess Gator Birthday Card!! =)

Pin It

AUGUST15_SFYTT

Hello!!
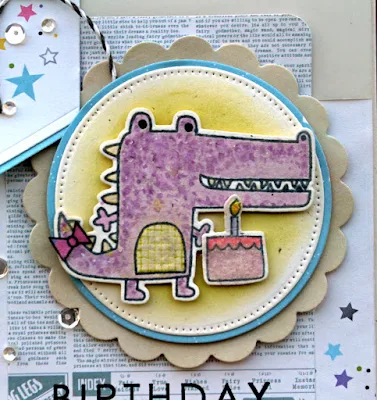
I'm stopping in to share the Card I've made for the Reverse Confetti #27 Sketch For You to Try August Challenge!! I just LOVE this SWEET Gator Image and I wanted to use it for a CUTE Birthday Card for a Friends Little Girls 4th Birthday!! SQUEAL!! She LOVES ANYTHING Princess and I thought it would be FUN to create a Princess Gator Birthday Card for her!! I added LOTS of GIRLY Colors and Sparkles so hopefully this will make her SMILE!! I used the Reverse Confetti Later Alligator Stamp Set along with the Coordinating Reverse Confetti Later Alligator Confetti Cuts Die Set for the main Images on my Card!! I used my Distress Inks to Water Color the Images and then used a Clear Wink of Stella Glitter Marker to add some Sparkle!! I also added some Distress Rock Candy Glitter to cover the Cake and then colored over that with the Clear Wink of Stella Glitter Marker!! I LOVE how it Sparkles!! I used the Reverse Confetti Stitched Flag Trio Confetti Cuts Die Set to create some FUN Banners and the Reverse Confetti Circles N' Scallops Confetti Cuts Die Set and Layered it with a Few other Circle Die Cuts for some added Dimension and Color!! For my Stamped and Embossed Sentiment I used two different Sentiments together after some Creative Masking was done using the Reverse Confetti Sweet Things Stamp Set and the Reverse Confetti So Very Special Stamp Set!! I added some Pretty Pink Posh Crystal Clear Sequins in both 4mm and 6mm and some Lawn Fawn Grey and White Twine and my Card was done!! =)
 
(A shot in the Sun to try and capture the AWESOME Sparkle!!??)
THANKS SO MUCH for stopping by and I hope you have a FABULOUS WEEKEND!!
COUNTRY HUGS-N-KISSES
LARISSA  =)

Tuesday, August 25, 2015

Retirement Butterfly Card for Paper Trey Ink August Blog Hop!! =)

Pin It

Blog-hop-logo
August Blog Hop Inspiration
Hello!!
I'm stopping in to share the Card that I've made for the August Paper Trey Ink Blog Hop!!
I just LOVE LOVE LOVE the Colors in this Inspiration Photo!! They just make me HAPPY!! I was having a HARD Time trying to decide on a Direction I wanted to go in because I was INSPIRED by SO MANY THINGS in this Photo!! After looking through my Paper Stash though I decided it would be FUN to create a Card using LOTS of Layers and Mixing the Different Colors along with adding in some of the Metallic Colors and then also adding some of the Soft Elements too!! This card is definitely a Play on the Hard and Soft Textures that are going on in the Inspiration Photo and this is what I came up with!! I used the Paper Trey Ink Life is Beautiful Die Collection and then I used the Paper Trey Ink Limitless Layers: 21/2 " Circle Die Collection to create my Window in the Front of the Card!! I Stamped and Embossed my Sentiment from the Paper Trey Ink Year Round Happiness Stamp Set onto one of the Small Banner Die Cuts from the Paper Trey Ink Double-Ended Banners Die Set!! I added some Colored Twine and some Sequins and my Card was done!! =)
I hope you like it as much as I do and if you have time I hope you'll JOIN in the FUN over on the Paper Trey Ink Blog!! If you don't have the Time to Create though don't FORGET to check out all of the AMAZING Inspiration!! I KNOW you WON'T be disappointed!!
THANKS SO MUCH for stopping by and I hope you have a FABULOUS WEEK!!
COUNTRY HUGS-N-KISSES
LARISSA   =)

Monday, August 24, 2015

BOO to You Card w/ Taylored Expressions!! =)

Pin It


Hello!!
I'm stopping in to share another Card for the Freshly Made Sketches #200 Challenge!! =) I decided to Flip the Sketch Up Side Down for this Card!!
I was the LUCKY Winner of the New Taylored Expressions Peek-A-Boo Pumpkins Stamp Set and the Coordinating Peek-A-Boo Pumpkins Die Set during their August Release Week!!
Whoop Whoop!! =)
Peek-A-Boo PumpkinsPeek-A-Boo Pumpkins Dies
So I just HAD to break them out and create a Card using them!! Squeal ~ I just LOVE them!! =) I started by Die Cutting the Taylored Expressions Starry Night Cutting Plate Die for my Background from some Chalkboard Cardstock!! I backed it with some Distress Water Color Paper that I Inked with Scattered Straw and Mustard Seed Distress Inks and then I Sprayed it with a mixture of Heidi Swapp Gold Color Shine Spray and some Glimmer Mist in Sun Sisters!! In real life it LOOKS SO NEAT!! The Stars Shimmer against the Black Chalkboard Cardstock as if they were Glowing!! I then used the Taylored Expressions Build a Scene~Rolling Hills Border Die Set to create the Ground that was Die Cut from some Green Patterned Paper from the New Taylored Expressions Build a Scene Halloween 6x6 Paper Pad!! I LOVE the Designs in this Pad, they are going to be PERFECT for my Halloween Projects!! =) I wanted to make my Scene Pop from the Card so I used the New Taylored Expressions Build a Tag 5 Die Set to Die Cut a Tag and then I used that for the Main Scene for my Card!! I Stamped and Die Cut the Pumpkins and then I added one of the Spiders from the New Taylored Expressions Drink if You Dare Die Set and cut it from some Glitter Covered Cardstock!! I added a May Arts Burlap Twine Bow and a Vintage Black Button and added some Clear Wink of Stella Glitter Marker to the Pumpkins for even more Sparkle and my Card was done!!

tried to capture the Sparkle and Glow in the Large picture so I hope you can see how NEAT it looks!!??
THANKS SO MUCH for stopping by and I hope you have a FABULOUS WEEK!!
COUNTRY HUGS-N-KISSES
LARISSA  =)